Have a Question?
Integration with Service Now
Integration with ServiceNow
Overview
ServiceNow integration enables seamless communication between your application and the ServiceNow platform. By setting up an integration, you can automate workflows, fetch data, or push updates to the ServiceNow system. This document outlines the steps required to configure an integration with ServiceNow.
Steps for ServiceNow Integration
1. Set Up the Integration
Navigate to the ServiceNow platform and access the configuration page for setting up a new integration.
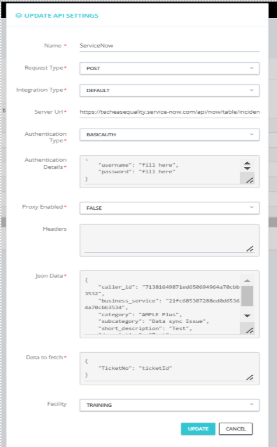
2. Enter Required Details
On the configuration page, provide the following information:
a. Name
· Enter a unique name for your integration to identify it easily. For example: ServiceNow.
b. Request Type
· Choose the appropriate type of request for the integration. Common options include:
o POST: To send data to ServiceNow.
c. Integration Type
· Select the type of integration. Typically:
o Default: Pre-configured for common use cases.
d. Server URL
· Provide the URL of the ServiceNow instance where the requests will be sent. For example: o https://techeaseequality.service-now.com/api/now/table/incident
e. Authentication Type
· Choose the authentication method required by the integration. Options include:
o Basic Auth: Requires a username and password.
f. Authentication Details
· Provide the specific details based on the chosen authentication type. For example:
o {
o “username”: “fill_here”,
o “password”: “fill_here”
o }
o
g. Proxy Enabled
· Specify whether a proxy is enabled for the integration. For example:
o FALSE
h. Headers
· Enter any necessary headers for the requests in JSON format. If no headers are required, this field can remain empty.
i. JSON Data
· Include the JSON payload to be sent with the request. For example:
o {
o “caller_id”: “71381649871ed5d6964954a70cbb3522”,
o “business_service”: “21fc68537288ed0d65364a72cbb3534”,
o “category”: “AMPLE Plus”,
o “subcategory”: “Data sync Issue”,
o “short_description”: “Test”,
o “description”: “Test Data Synchronization Issue”
o }
o
j. Data to Fetch
· Specify the part of the response JSON that you want to extract and use. For example:
o {
o “TicketNo”: “ticketId”
o }
k. Facility
· Select the appropriate facility or endpoint associated with the integration, if applicable. For example:
o TRAINING
Testing and Validation
- Verify that the integration is correctly configured by sending test requests.
- Validate the responses to ensure the data is fetched or updated as expected.
- Debug any errors by reviewing the request and response logs.
Conclusion
By following these steps, you can successfully set up an integration with ServiceNow. This integration enables you to automate processes and improve efficiency in your workflows.